
Restricting Assessment Access #
There are a few different approaches to monetizing or restricting access to your assessment:
- Embed your assessment on a page that is behind a paywall. For example, you can embed your assessment on a page in WordPress or popular learning management systems (LMS) such as Kajabi, Teachable, and Thinkific. This approach is the subject of this article. Keep reading to learn more!
- Use Digital Access Codes to limit access to your assessment. You can either generate and send codes manually or sell your assessment in your web store and send codes automatically when a purchase is made.
You can restrict access to your assessment to authorized users by placing it inside a Learning Management System (such as Kajabi or Thinkific) or membership portal. This tutorial explores how to set up a membership portal in WordPress. If you also want to monetize your assessment, you can optionally configure your site to require visitors to purchase access to the membership portal.
Overview #
Here’s how we’ll go about restricting access to your assessment. This tutorial assumes that you’ll be selling access, but if you want only to limit access to authorized users, you can skip the steps involving WooCommerce products.
- Use WooCommerce to create products and accept payments.
- When a respondent buys your assessment, we’ll use Woocommerce memberships to grant the respondent a membership on your site.
- That membership will give them access to a page on your site where your assessment is embedded.
What You’ll Need #
In addition to your WordPress site, you’ll need three plugins:
- WooCommerce (free) allows you to create products and accept payments on your site.
- The WooCommerce Memberships extension ($199) works with WooCommerce to give your buyers a membership on your site after purchasing your assessment.
- The Advanced Iframes plugin (free) allows you to embed your assessment on a page in your WordPress site.
- (Optional) The WooCommerce Custom Thank You Pages extension ($49) will direct your respondents to your assessment after they complete their purchase.
Install each of those plugins on your WordPress site.
Configure WooCommerce and Create Your Product #
First, configure a payment method in WooCommerce. Stripe is a very popular and easy-to-use payment gateway included with WooCommerce. Read more about how to set up Stripe Payments.
Next, set up a product for your assessment. Since this isn’t a physical item, you’ll want to create a virtual product.
Create a Page to Host Your Assessment #
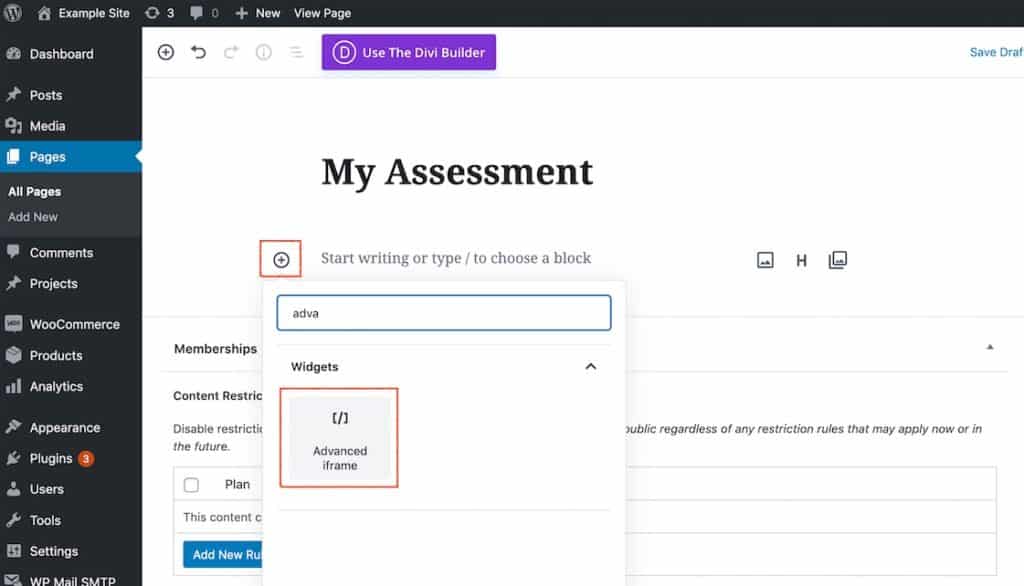
Next, we’ll create the page where your assessment will live. In WordPress, add a new page.
Give your page a title, and add a new block to the page. In the block type selector, type “iframe” in the search box. If the advanced iframe plugin is installed, you should see an “Advanced iframe” block. Select it.
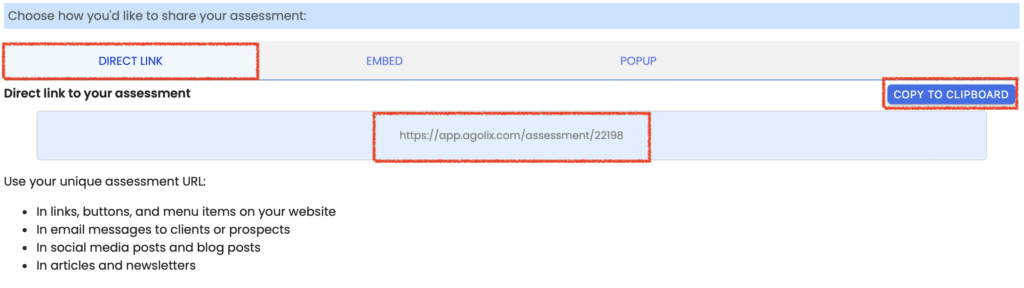
Log into your Agolix account and select “Share Assessment” for the assessment you want to embed on your site. Click “Copy to Clipboard” to copy the direct link to your assessment.

Click “Copy to Clipboard” to copy the direct link to your assessment.
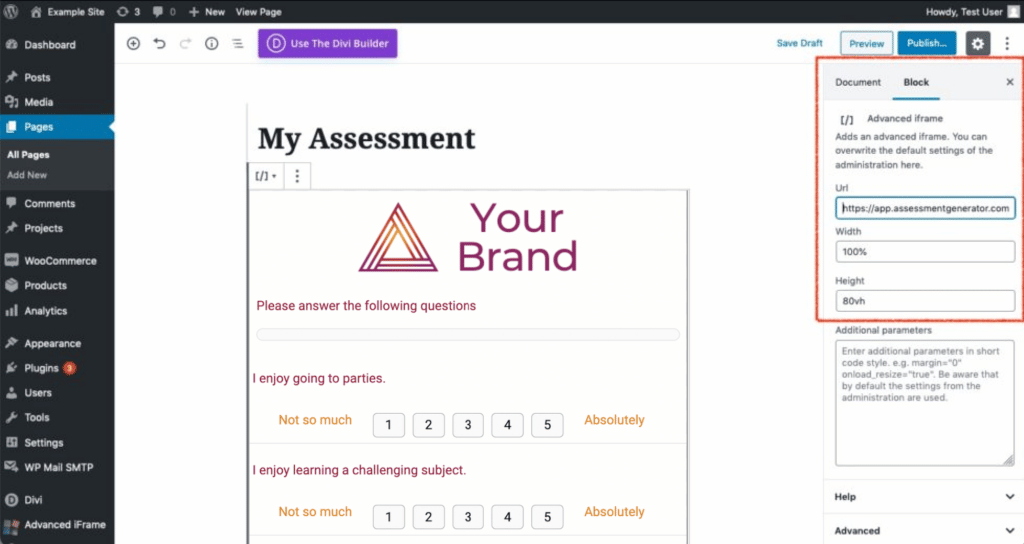
Once the iframe block is on the page, settings for the block will appear in the right panel. Paste the link to your assessment in the URL field. Leave the width set to 100%.
The proper height for the iframe will depend on the length of the pages in your assessment. A value of 80vh (80% of the browser height) is a good place to start, but feel free to set this value to whatever looks best on your site.
Save the page. If you visit the page now, you should be able to view and take your assessment.
Restrict Your Assessment to Paid Members #
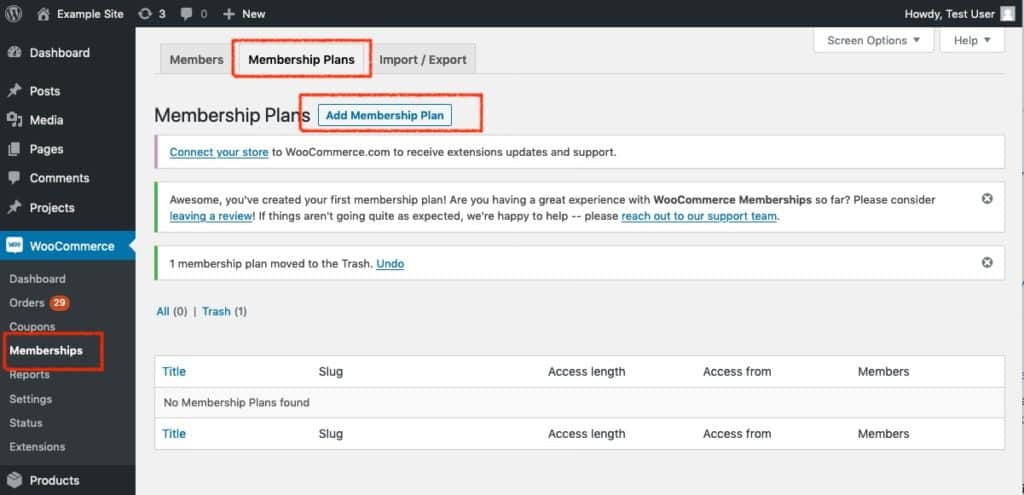
Next, we’ll use the Woocommerce Membership plugin to ensure that only paid respondents may access your assessment. Open the WooCommerce menu in the left navigation of your WordPress site, and click “Memberships.”
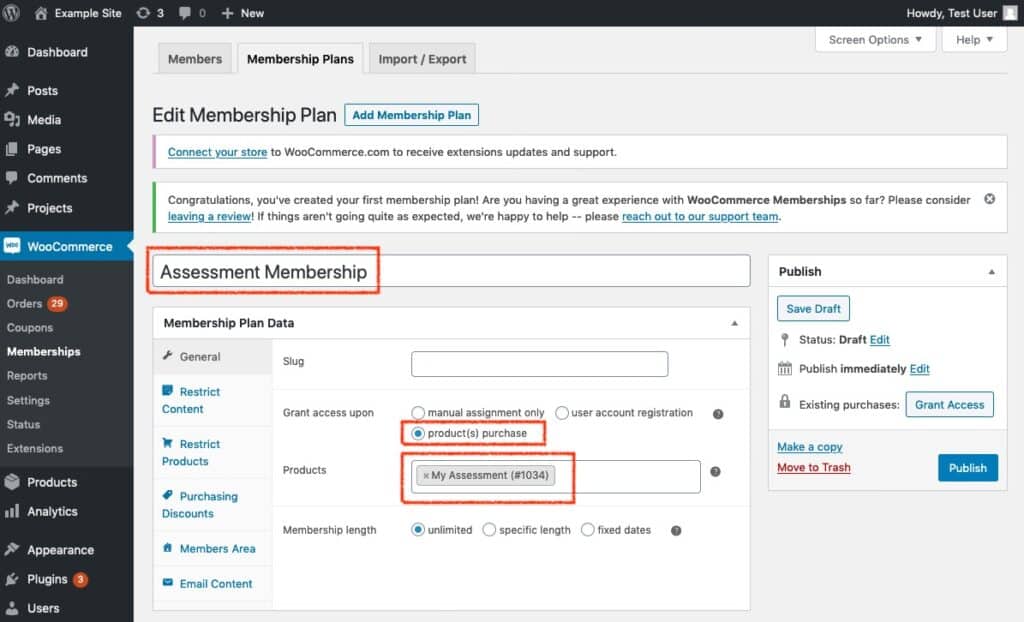
Next, click the “Membership Plans” tab and “Add Membership Plan.”
Give your Membership Plan a name, and set the “Grant access upon” option to “product(s) purchase.” In the “Products” field, start typing the name of the product you created earlier and select that product.
When someone buys the product, they’ll be given membership to your site.
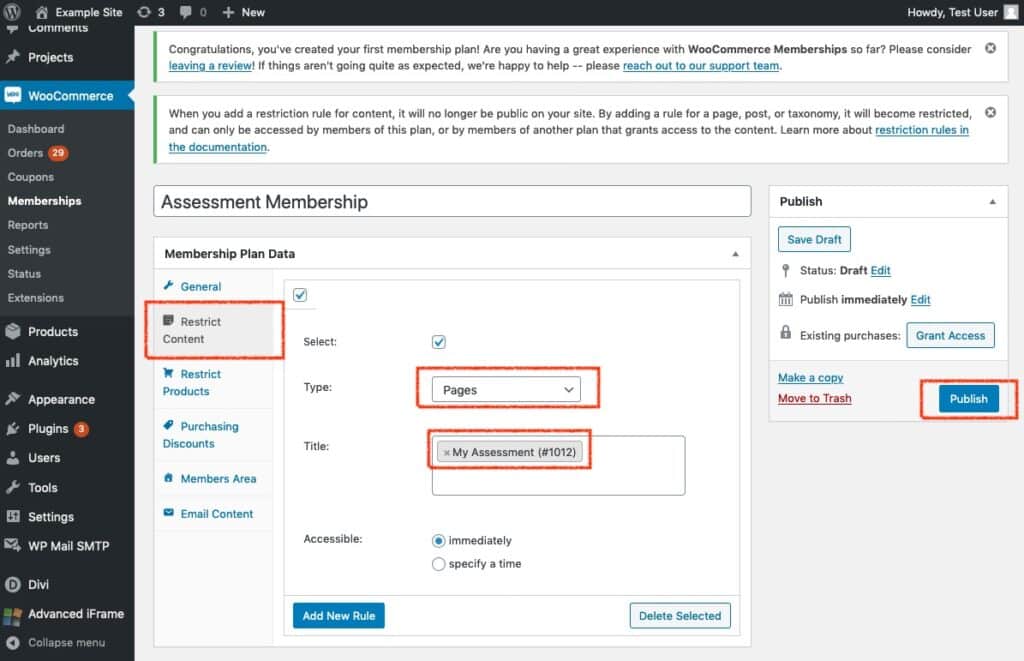
Next, we need to restrict the page where your assessment lives so that it’s visible only to members.
Select the “Restrict Content” tab, set “Type” to “Pages,” and start typing the title of your assessment page in the Title box. When your page appears, select it.
Click “Publish” to save changes to your membership site.
We must provide the customer with a link to the assessment after purchasing. There are several ways to do this.
If this is the only product on your site, you can edit the order confirmation page to include a link to your assessment page. The order confirmation page is created automatically by Woocommerce and is listed among your other WordPress pages.
If you have more than one product on your site, or if you’d like to send your respondents directly to your assessment after their purchase, you can use the WooCommerce Custom Thank You Pages extension [$49]. Alternatively, this blog post describes some other free and paid options.
A paid assessment can be a great way to generate income from your expertise, and we hope this guide has helped you get started.
If you need additional assistance setting this up, your web developer may be able to help.
If you’re not currently working with a developer, we offer consulting services and will be happy to provide you with a free, no-obligation quote. Contact us to learn more.
Please review the rest of the User Guide to learn more about our software.
Thank you for choosing Agolix by Assessment Generator!


