
Require Access Codes #
Requiring a digital access code prevents unauthorized users from accessing your assessment.
For example, you might have an assessment that you use in your coaching or consulting practice that should only be available to clients who have signed up for your program, or perhaps you have an assessment that you want to make available for purchase.
There are two ways to use access codes with your assessment:
- Manual: Generate digital access codes to restrict access to your assessments to only respondents you allow. Learn more about this method here.
- Automated: Link your online store to your assessment and automatically send an access code to your buyers.
The automated approach is described below using WordPress and WooCommerce.
Sell Assessments with Access Codes via WordPress & WooCommerce #
In this tutorial, we’ll set up your WooCommerce online store so that you can sell access to your assessments.
First, we’ll configure your assessment so that a one-time use access code is required to complete your assessment. Then we’ll create a product in your online store that, when purchased, will automatically instruct Agolix to create an access code for your buyer and email them a link to your assessment containing that code.
What you’ll need #
- An Advanced, Private Label, or Enterprise account containing the assessment that you want to sell
- A WordPress online store using Woocommerce
- The Woocommerce Zapier plugin installed on your WordPress site($79 / year)
- A free Zapier account
Create a Virtual Product in WooCommerce #
First, create a new virtual product in your store. Follow the official documentation, or there are many online tutorials to help. For ease of testing, set the price to zero.
Find the numeric assessment identifier for your assessment. Edit your assessment and select Actions -> Share Assessment. The identifier is the number at the end of the assessment URL:
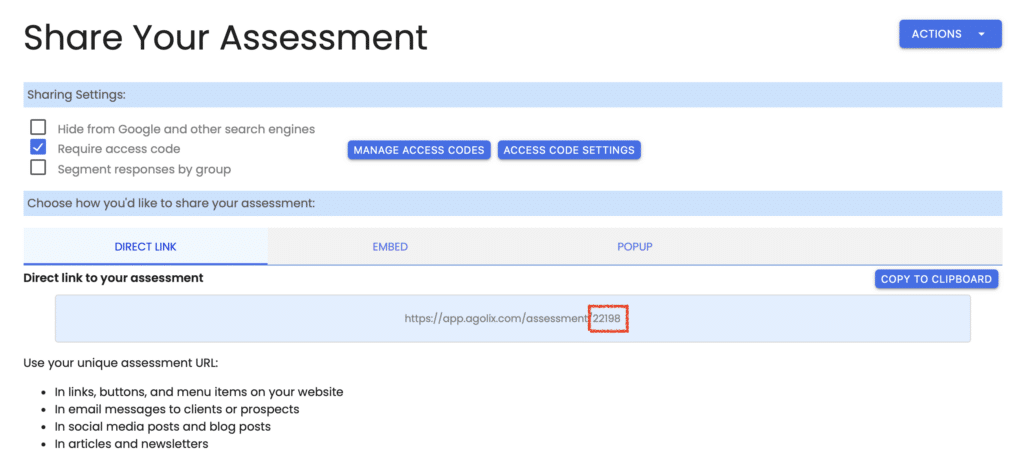
In the product list display in WordPress, click “Quick Edit” for the product you added in step 1. Set the SKU number to “ASMT-” followed by the numeric identifier you found in step 2.
For example, if the URL to your assessment is https://app.agolix.com/assessment/22198, you would use ASMT-22198 for your SKU number.
If this is the first product in your store, we recommend creating a test order to make the rest of the setup go more smoothly.
Create a Zap in Zapier to Notify Assessment Generator When a Purchase is Made #
In this section, we’ll create a Zap informing Agolix when someone buys your assessment. First, log into your Zapier account and click “Create Zap.”
Configure WooCommerce as your “Trigger” app #
- In Zapier’s zap creation interface, search for WooCommerce and select it as the trigger app.
- (Choose app & event) Click the “Choose an Event” dropdown and select “Order” as the trigger event that will notify Agolix to send an access code to your buyer.
- Click Continue.
- (Choose account) Click the WooCommerce account dropdown menu and select “Connect a new account” (If you’ve already configured a Zapier account for WooCommerce, you can select the existing account).
- A popup will appear that will guide you through connecting Zapier securely to your WooCommerce store.
- (Set up trigger) Click the “Trigger Rule” dropdown, and select “Order” created.
- Click “Continue.”
- Click “Test Trigger. This will retrieve either a recent order from your store or a sample order if no orders are available.
- Click “Continue” to create the “Action” for the Zap.
Configure Agolix as your “Action” app #
- Search for Agolix and select it for your “Action” app.
- (Choose app & event) In the Event dropdown, choose “Generate Access Code.”
- Click “Continue.”
- (Choose account) Click the Agolix account dropdown and select “Connect a new account” (If you’ve already configured Zapier with your Agolix account, you can select the existing account).
- A popup will appear, prompting you to log into your Agolix account and copy your API Key from your “My Account” page.
- Click “Continue.”
- (Set up Action) Here you’ll route the data sent from WooCommerce to Agolix so that it knows which assessment(s) to generate access codes for and where to send them.
- (Buyer First Name) Click “Enter text or insert data,” then select “Billing First Name.”
- Click “Continue.”
- Click outside the popup to move to the next field.
- (Buyer Last Name) Follow the same process to select the “Billing Last Name” field.
- (Buyer Email) Click Search all available fields, enter “email,” and select “Billing Email.”
- Next, you’ll see an indented set of fields labeled “Line Items.” If your customer purchases more than one assessment at a time, they will be sent invitations to each of them.
- (Assessment Id) Click Search all available fields, enter “SKU,” and select “Line Items SKU.”
- (Group) (Optional) You may type in a group name for all assessments purchased through your store. For example, if you enter “web_store” as your group, every response to your assessment that comes from a sale in your store will be tagged with the group “web_store.” (Groups cannot include the following characters: &, ?, /, %.)
- Click “Continue.”
- (Test Action) Click “Test Action.”
- Click “Publish Zap,” then “Publish & Turn On.”
Set your Assessment to Require an Access Code #
The last step is configuring your assessment so it cannot be accessed without a code purchased from you and configuring the email sent when someone buys the assessment.
Log into your Agolix account. Find the assessment you created in your store and click “Share Assessment.”

Click the checkbox to “Require Access Codes.”

Go to your web store and purchase your assessment.
You should receive two emails. One is the standard purchase confirmation email from WooCommerce, and the other will contain a link to your assessment with the access code embedded in it. You can click on that link, which will take you to your assessment. You won’t need to enter the access code because it is part of the link you were sent. If you complete the assessment and then try the same link again, you’ll be prompted for an access code because the link you followed has already been used and is now invalid.
Customize the Order Delivery Email #
Click the Access Code Settings button on the “Share Assessment” page. Scroll to the “Order Delivery Email” section to modify the email sent to your buyers. Use the “Merge Codes” dropdown menu to add merge code variables for:
- The link to your assessment containing the access code
- The title of your assessment
- The access code itself

Please review the rest of the User Guide to learn more about our software.
Thank you for choosing Agolix by Assessment Generator!


