
Require Access Codes #
Requiring a digital access code prevents unauthorized users from accessing your assessment.
For example, you might have an assessment that you use in your coaching or consulting practice that should only be available to clients who have signed up for your program, or perhaps you have an assessment that you want to make available for purchase.
There are two ways to use access codes with your assessment:
- Manual: Generate digital access codes to restrict access to your assessments to only respondents you allow. Learn more about this method here.
- Automated: Link your online store to your assessment and automatically send an access code to your buyers.
The automated approach is described below.
Monetize Assessments with Access Codes #
This page explores how to monetize your assessment by restricting access and selling unique, single-use access codes from your online store.
Let’s dive in. Here’s what you need to get started:
- An Advanced, Private Label, or Enterprise subscription with Agolix
- An online store using software that supports Zapier integrations. Most of the popular platforms qualify, such as
- A free account with Zapier
- If you have a WordPress store such as WooCommerce, you may also need a plugin to allow your store to interface with Zapier.
Here are the steps to follow to start making money from your assessment.
Enable Access Codes #
Log into your Agolix account and click the “Share Assessment” link for your assessment.

Select the checkbox labeled “Require Access Code.”

Now click “Actions” -> “Test Assessment.” You should see your assessment in a new tab, prompting you for an access code. Without that code, you can’t proceed to the assessment. Now we need to generate some access codes.
Add a Virtual Product to your Online Store #
Log into the administration panel for your online store and add a new product. The product should be “virtual” because there is no physical product to ship.
Assign a Product SKU Number to Identify it to Assessment Generator #
On the Share Assessment page of your Agolix account, locate the numeric assessment identifier for your assessment. This can be found in the “direct link” to your assessment:
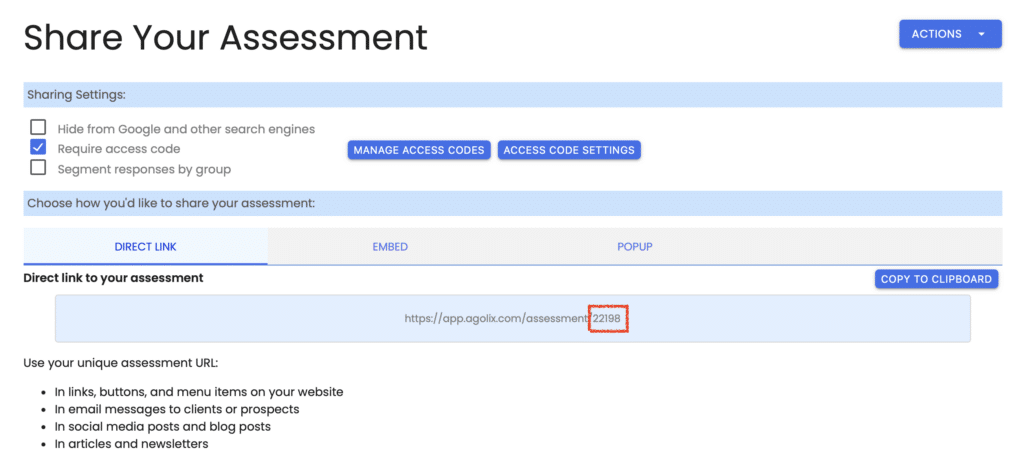
In the screenshot above, the assessment ID number is 22198. To avoid confusion with other products in your store, add “ASMT-” before the identifier. For this example, your complete SKU number would be “ASMT-22198.”
Return to your web store and enter that value as the SKU number of the product you created for your assessment. If your store does not have a product SKU number field, you can use a different field, for example, Product ID.
Finish setting up your product by adding an image, description, and price. For testing, it is sometimes helpful to set a zero price (i.e., $0.00) to place an order easily and verify that the process is working.
Create a Zapier Integration to notify Assessment Generator when a Purchase is made #
Log into your Zapier account and click Create Zap. The process for creating the Zap will be slightly different depending on your web platform, but the general steps are as follows:
Select Your E-Commerce Platform for Your Trigger App #
- Zapier will prompt you to select a “Trigger” app. This will be your web store since that’s where the action occurs that will kick off the process. Please search for your web store platform (for example, Woocommerce or Shopify) and enter it here.
- Next, Zapier will ask you to select an action. This will be “Order Created” or something similar.
- You’ll need to provide account information for your e-commerce store to Zapier. Zapier will show a popup that will guide you through connecting Zapier securely to your online store.
- Once your online store has been connected, Zapier will ask you which app should be notified when the trigger action occurs. Search for Agolix and enter it here.
- Zapier will ask you which event should occur when your assessment is purchased. Select “Generate Access Code.”
Enter Assessment Generator for Your Action App #
- Next, Zapier will ask you to connect to your Agolix account. It will guide you to find your Agolix API key on your “My Account” page.
- Set up the Zapier Action to route the purchase data from your web store to Agolix. Map the appropriate fields from the store’s order information to Agolix:
- Buyer First Name
- Buyer Last Name
- Buyer Email
- Assessment Id – Map the SKU number field from your web store to the Assessment ID field. If you used a different field to enter the SKU number (“ASMT-xxxxx”), map that field instead.
- (Group) (Optional) You may type in a group name for all assessments purchased through your store. For example, if you enter “web_store” as your group, every response to your assessment that comes from a sale in your store will be tagged with the group “web_store.” (Groups cannot include the following characters: &, ?, /, %.)
- Click “Continue.”
- Click “Test Action.”
- Click “Publish Zap,” then “Publish & Turn On.”
Test a Purchase #
Now you can go to your web store and purchase your assessment. You should receive the normal purchase confirmation email from your web store when someone buys a product from you.
You will also receive a separate email containing a link to your assessment with the newly generated access code. These emails will be sent to the email address you entered when you purchased the product. Depending on how frequently your web store executes the Zap, the email message may take several minutes to arrive.
Customize the Order Delivery Email #
The email you received containing the link to your assessment in step 3 is the default email. To customize it, go to the “Share Assessment” page in Agolix, and click “Access Code Settings.”
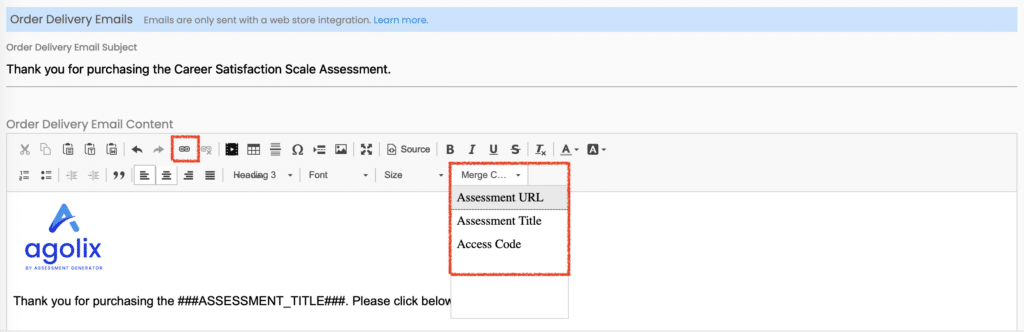
Be sure to scroll down to find the editor window to enter your “Order Delivery Email” content.

In the popup, scroll down to the section labeled “Order Delivery Emails.” You can change the email’s subject line and modify the email’s content. In the Email content editor, the “Merge Codes” dropdown menu contains special variables that represent:
- The access code itself
- A link to the purchased assessment containing the access code
- The assessment title
You can use these merge codes to form links. The “Assessment URL” merge code is used in the “Start Now” link shown in the email by default.
You can also use the “Link” tool in the editor menu to create links:
If you have an Advanced subscription, the invitation email will be sent from Agolix. With Private Label and Enterprise plans, you can configure a custom email-sending domain so the email will come from your domain.
Customize the Access Code Request Page #
When someone buys your assessment, they will receive a link to the assessment that contains the access code. When they click this link, they won’t have to enter the access code themselves to begin the assessment.
But what happens if someone finds your assessment through a search engine?
This is a perfect opportunity to drive traffic back to your site or even directly to your store, where they can buy an access code.
At the top of the “Access Code Settings” menu, you can modify the page shown to users who arrive at your assessment without an access code.
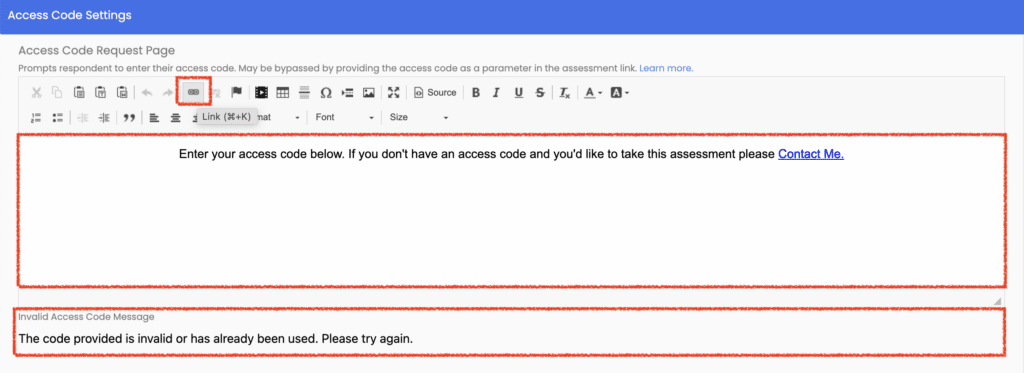
Use the “Link” tool to add links to your website or web store. By default, a contact link is included that triggers an email to the address associated with your account.
Please review the rest of the User Guide to learn more about our software.
Thank you for choosing Agolix by Assessment Generator!


