
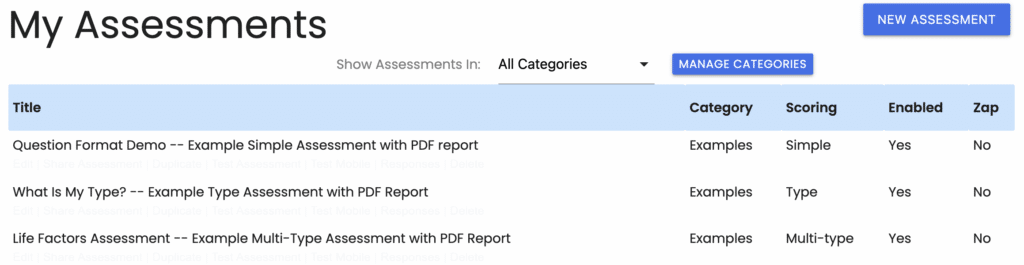
Dashboard Overview #
When you first log into your account, you’ll be directed to your account dashboard.
New Assessment Button #
The “New Assessment” button is in the dashboard’s upper right corner.

Click this button to create a new assessment.
See Create Your First Assessment for details.
Categories #
With Enterprise plans, several settings are available to help you organize your assessments by category.

Filter Assessments by Category #
The “Show Assessments” drop-down menu offers the ability to show only assessments that are assigned to a specific category. The “All Categories” setting is selected by default.
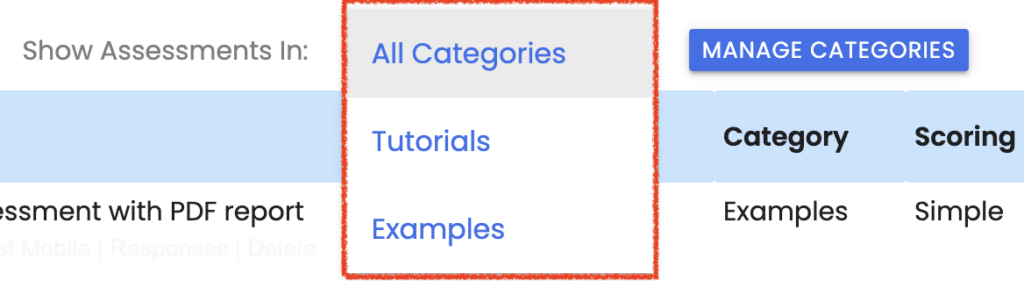
See Assign to Assessment Category for more details.
Manage Categories #
Click the “Manage Categories” button to view a list of your Categories on a dedicated screen.

Create A New Category #
Click the “Create a New Category” button to create a new assessment category.

Edit Category #
When you do so, a window on the screen will allow you to enter the details for your category.
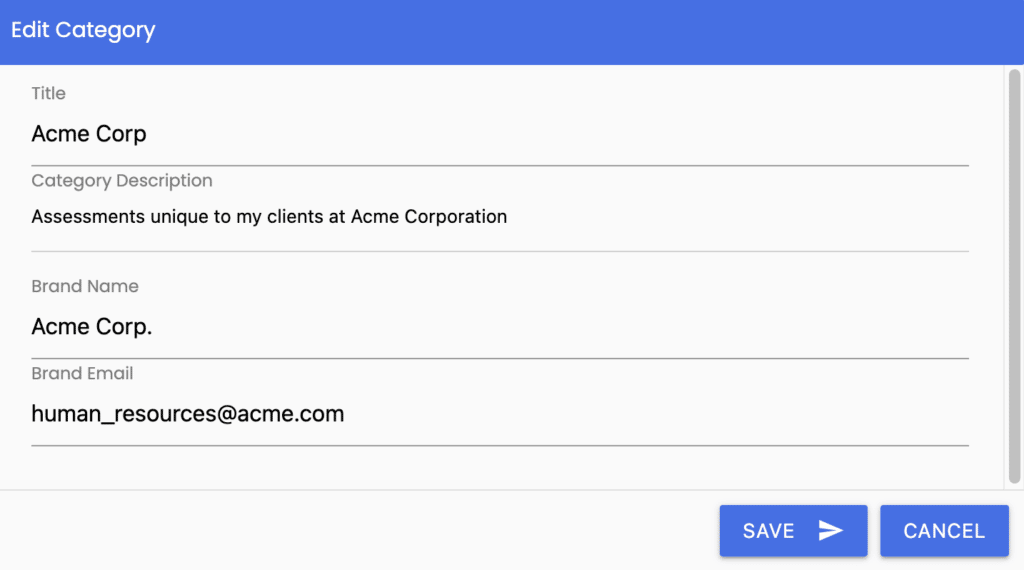
In addition to the Title, you can also enter these details for each category:
- Category Description: a text description to help you remember why the category was created
- Brand Name: specify the brand name for the “From” field in Results email messages for the assessments in each category.
- Brand Email: specify the brand email address for the “Reply-To” field in Results email messages for the assessments in each category.
Click the “Save” button to complete the creation of your category.
Your new category will show on the list along with the description.
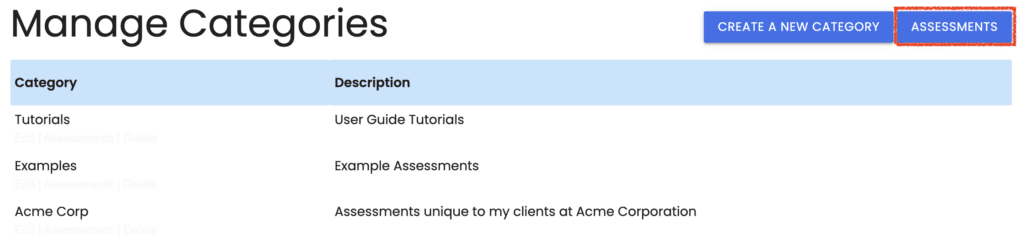
Click the “Assessments” button to return to the Assessment Dashboard.
Dashboard Column Headings #
The following headings are shown at the top of the columns on the Assessment Dashboard.

- Title: Assessment Title (as entered on the “Setup Tab” — see Assessment Setup for details)
- Category: Assessment Category (for Enterprise plans only; as entered on the “Setup Tab” — see Assessment Setup for details)
- Scoring: The scoring model chosen for each assessment. It can be Simple, Type, or Multi-type.
- Enabled: An indication of whether the assessment is enabled so that respondents can complete the assessment. It can be Yes or No.
- Zap: This column indicates whether the assessment has an active integration with an external application through Zapier, so the respondent information is shared with that application upon assessment completion. It can be Yes or No.
List of Assessments #
Below the headings is the list of assessments in your account, with the most recently edited assessment at the top.

Several complementary assessment examples are automatically loaded into your account when you first create it. By default, they are disabled, so they do not count against your active assessment limit.
Assessment Menu Options #
When you mouse over each assessment, you’ll see a menu of options underneath.

Here is the list of options available for your assessments:
- Edit: Enter the assessment editor to modify settings for this assessment.
- Share Assessment: Go to the Share Assessment page for this assessment.
- Duplicate: Make an exact copy of the assessment.
- Test Assessment: Test your assessment to view operation on a desktop or laptop.
- Test Mobile: Test your assessment to view operation on a mobile device.
- Responses: View the Responses Page for this assessment.
- Delete: Completely remove the assessment from your account. Confirmation required. This command cannot be undone.
Please review the rest of the User Guide to learn more about our software.
Thank you for choosing Agolix by Assessment Generator!


